
最近学习使用 rocketmq,需要搭建 rocketmq 服务端,本文主要记录 rocketmq 搭建过程以及这个过程踩到的一些坑。至于有多简单呢,在本机已有Docker环境的情况下只需要三步即可。
- 从github上面拉取项目
- 修改
broker.conf中的brokerIP1参数,修改为本机IP - 进入
docker-compose.yml文件所在路径,执行docker-compose up命令即可
前言
首先我们是使用Docker进行搭建环境的,所以我们先要在自己机器上的安装Docker,具体的安装过程以及对于Docker的介绍官方文档里面说的很清楚了https://docs.docker.com/get-started/。
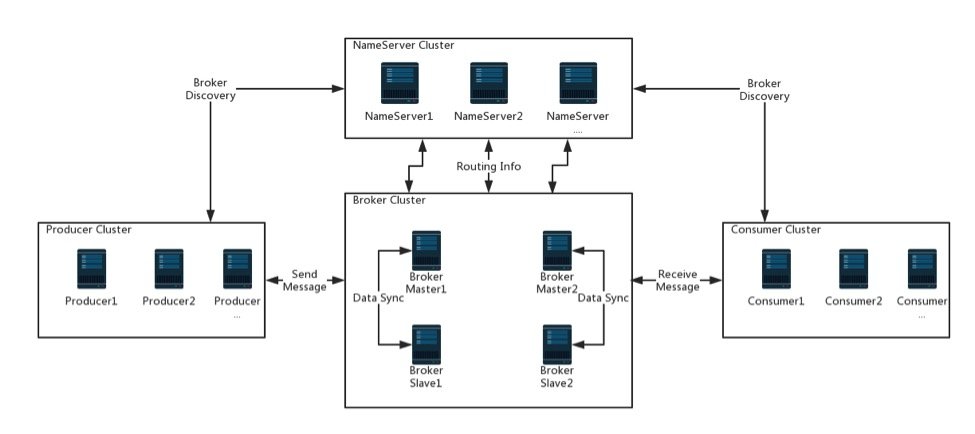
我们要搭建RocketMQ服务器,那么我们就要知道大概搭建RocketMQ服务器需要部署哪些东西。对于RocketMQ有一个架构图,如下所示。而图中所示的Producer(生产者)和Consumer(消费者)无需我们搭建,因为那是作为一个服务器进行启动的。nameserver就是一个注册中心一样组件,我们可以将其简单理解成springcloud中的Eureka,那么nameserver是需要我们搭建的。broker就是真正处理消息的地方,也是需要我们搭建的。
正常情况我们搭建上面所提到的两个组件其实就能已经能够满足我们的发送接收消息的需求了。但是通常情况下我们还需要搭建一个Web可视化的平台用来查看MQ的服务状态、消息的消费情况、主题的队列配置等等。这里使用rocketmq-console。同样也是通过Docker来进行安装。
部署
上面我们提到了需要安装三个组件,那么这三个组件又是需要能够互相通信连接的,考虑到分开部署进行配置连接信息比较麻烦,于是这里我们采用docker-compose进行配置部署。
首先我们需要创建docker-compose.yml配置文件。文件内容如下
version: '3.5'
services:
  rmqnamesrv:
    image: foxiswho/rocketmq:server
    container_name: rmqnamesrv
    ports:
      - 9876:9876
    volumes:
      - ./logs:/opt/logs
      - ./store:/opt/store
    networks:
        rmq:
          aliases:
            - rmqnamesrv

  rmqbroker:
    image: foxiswho/rocketmq:broker
    container_name: rmqbroker
    ports:
      - 10909:10909
      - 10911:10911
    volumes:
      - ./logs:/opt/logs
      - ./store:/opt/store
      - ./conf/broker.conf:/etc/rocketmq/broker.conf
    environment:
        NAMESRV_ADDR: "rmqnamesrv:9876"
        JAVA_OPTS: " -Duser.home=/opt"
        JAVA_OPT_EXT: "-server -Xms128m -Xmx128m -Xmn128m"
    command: mqbroker -c /etc/rocketmq/broker.conf
    depends_on:
      - rmqnamesrv
    networks:
      rmq:
        aliases:
          - rmqbroker

  rmqconsole:
    image: styletang/rocketmq-console-ng
    container_name: rmqconsole
    ports:
      - 8080:8080
    environment:
        JAVA_OPTS: "-Drocketmq.namesrv.addr=rmqnamesrv:9876 -Dcom.rocketmq.sendMessageWithVIPChannel=false"
    depends_on:
      - rmqnamesrv
    networks:
      rmq:
        aliases:
          - rmqconsole

networks:
  rmq:
    name: rmq
    driver: bridge
然后在与docker-compose.yml同级下面相应的建立三个文件夹conf、logs、store。然后在conf文件夹下面建立broker.conf配置文件,所有文件的目录位置如下所示。
docker-compose.yml
conf
	- broker.conf
logs
store
然后在编写broker.conf配置文件里面的内容
# Licensed to the Apache Software Foundation (ASF) under one or more
# contributor license agreements.  See the NOTICE file distributed with
# this work for additional information regarding copyright ownership.
# The ASF licenses this file to You under the Apache License, Version 2.0
# (the "License"); you may not use this file except in compliance with
# the License.  You may obtain a copy of the License at
#
#     http://www.apache.org/licenses/LICENSE-2.0
#
#  Unless required by applicable law or agreed to in writing, software
#  distributed under the License is distributed on an "AS IS" BASIS,
#  WITHOUT WARRANTIES OR CONDITIONS OF ANY KIND, either express or implied.
#  See the License for the specific language governing permissions and
#  limitations under the License.


# 所属集群名字
brokerClusterName=DefaultCluster

# broker 名字,注意此处不同的配置文件填写的不一样,如果在 broker-a.properties 使用: broker-a,
# 在 broker-b.properties 使用: broker-b
brokerName=broker-a

# 0 表示 Master,> 0 表示 Slave
brokerId=0

# nameServer地址,分号分割
# namesrvAddr=rocketmq-nameserver1:9876;rocketmq-nameserver2:9876

# 启动IP,如果 docker 报 com.alibaba.rocketmq.remoting.exception.RemotingConnectException: connect to <192.168.0.120:10909> failed
# 解决方式1 加上一句 producer.setVipChannelEnabled(false);,解决方式2 brokerIP1 设置宿主机IP,不要使用docker 内部IP
brokerIP1=192.168.1.16

# 在发送消息时,自动创建服务器不存在的topic,默认创建的队列数
defaultTopicQueueNums=4

# 是否允许 Broker 自动创建 Topic,建议线下开启,线上关闭 !!!这里仔细看是 false,false,false
autoCreateTopicEnable=true

# 是否允许 Broker 自动创建订阅组,建议线下开启,线上关闭
autoCreateSubscriptionGroup=true

# Broker 对外服务的监听端口
listenPort=10911

# 删除文件时间点,默认凌晨4点
deleteWhen=04

# 文件保留时间,默认48小时
fileReservedTime=120

# commitLog 每个文件的大小默认1G
mapedFileSizeCommitLog=1073741824

# ConsumeQueue 每个文件默认存 30W 条,根据业务情况调整
mapedFileSizeConsumeQueue=300000

# destroyMapedFileIntervalForcibly=120000
# redeleteHangedFileInterval=120000
# 检测物理文件磁盘空间
diskMaxUsedSpaceRatio=88
# 存储路径
# storePathRootDir=/home/ztztdata/rocketmq-all-4.1.0-incubating/store
# commitLog 存储路径
# storePathCommitLog=/home/ztztdata/rocketmq-all-4.1.0-incubating/store/commitlog
# 消费队列存储
# storePathConsumeQueue=/home/ztztdata/rocketmq-all-4.1.0-incubating/store/consumequeue
# 消息索引存储路径
# storePathIndex=/home/ztztdata/rocketmq-all-4.1.0-incubating/store/index
# checkpoint 文件存储路径
# storeCheckpoint=/home/ztztdata/rocketmq-all-4.1.0-incubating/store/checkpoint
# abort 文件存储路径
# abortFile=/home/ztztdata/rocketmq-all-4.1.0-incubating/store/abort
# 限制的消息大小
maxMessageSize=65536

# flushCommitLogLeastPages=4
# flushConsumeQueueLeastPages=2
# flushCommitLogThoroughInterval=10000
# flushConsumeQueueThoroughInterval=60000

# Broker 的角色
# - ASYNC_MASTER 异步复制Master
# - SYNC_MASTER 同步双写Master
# - SLAVE
brokerRole=ASYNC_MASTER

# 刷盘方式
# - ASYNC_FLUSH 异步刷盘
# - SYNC_FLUSH 同步刷盘
flushDiskType=ASYNC_FLUSH

# 发消息线程池数量
# sendMessageThreadPoolNums=128
# 拉消息线程池数量
# pullMessageThreadPoolNums=128
配置文件中的内容我们只需要改动一点即可,即brokerIP1 这个属性,我们将其更改为我们本机的ip,可以利用ipconfig进行查看。
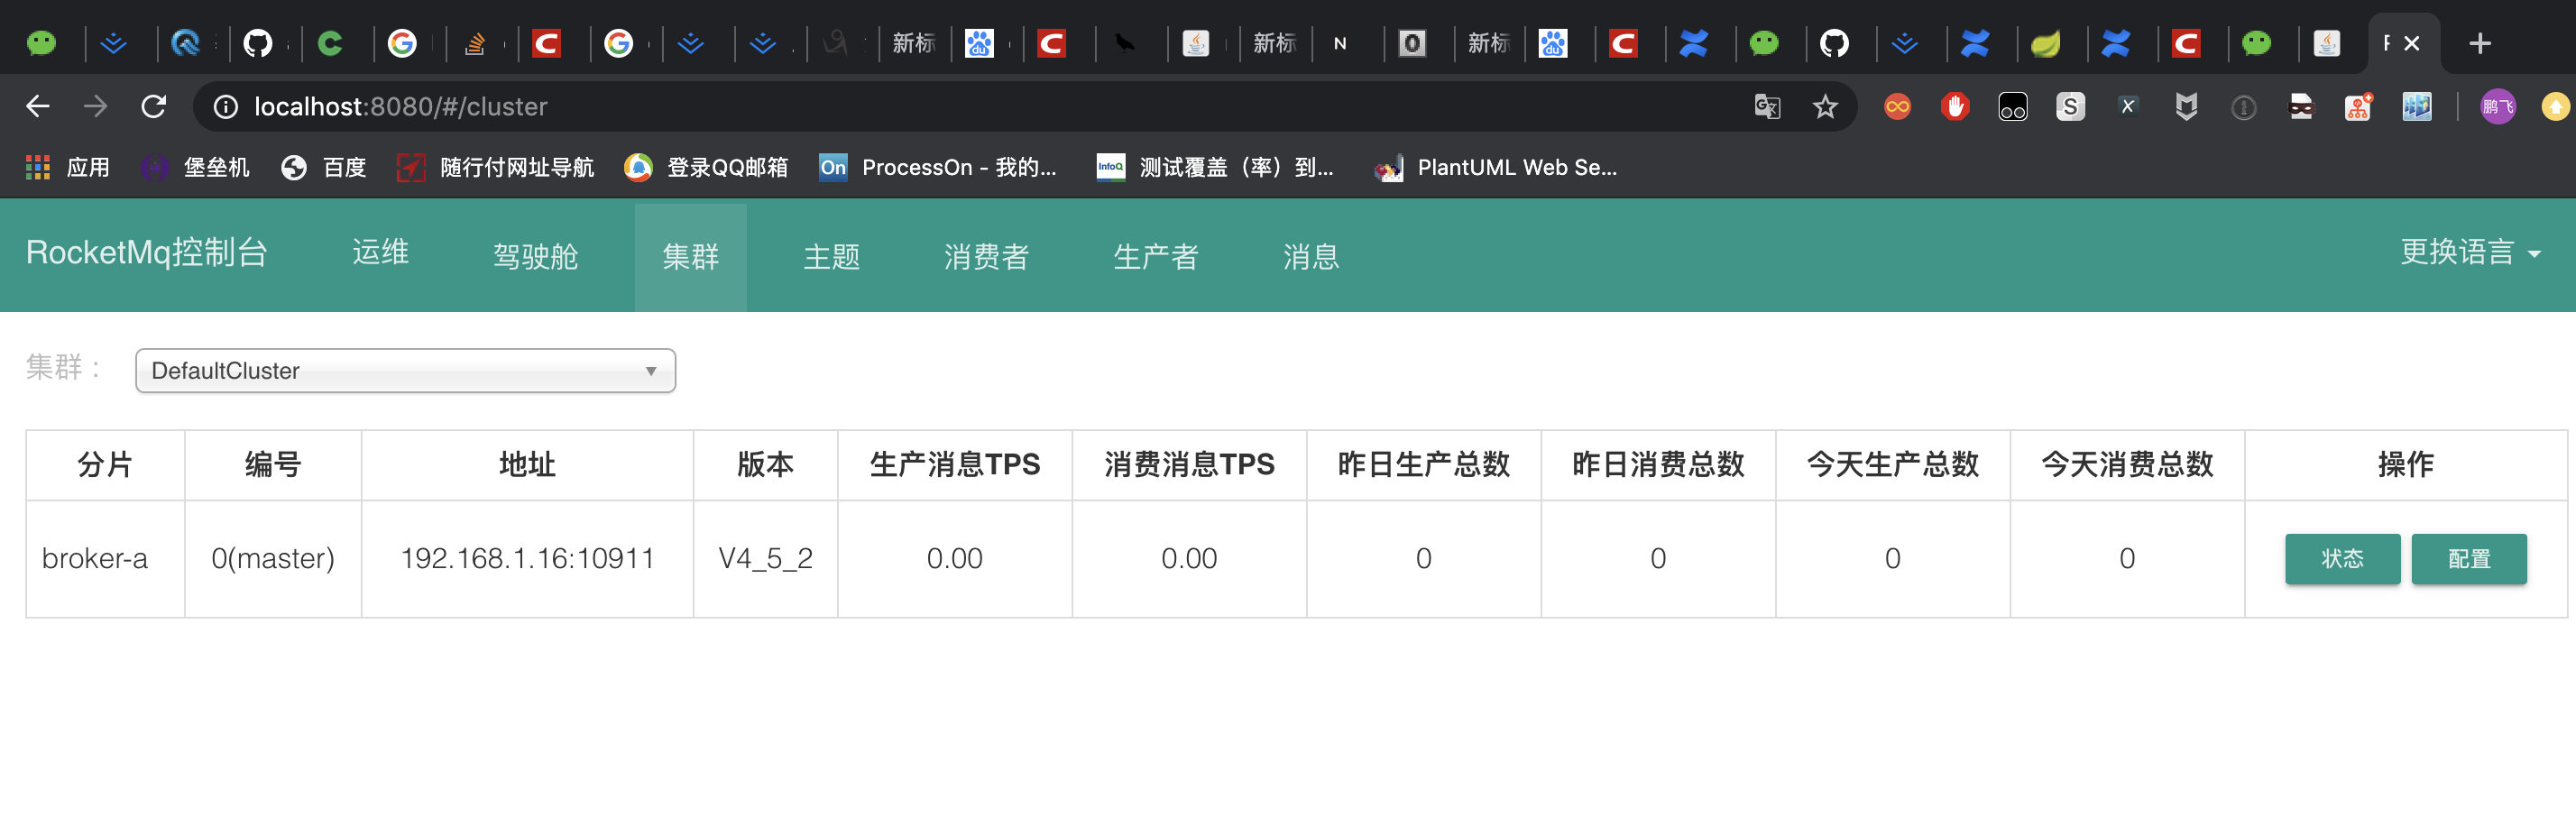
修改完以后我们直接在docker-compose.yml文件所在的位置输入命令docker-compose up即可启动。启动成功以后在浏览器中输入http://localhost:8080/即可看到管理页面,就表示我们搭建成功了。
使用Springboot快速上手
这里将会使用 springboot 快速上手使用 mq,将会使用rocketmq-spring-boot-starter模块。
pom 配置如下
<!--在pom.xml中添加依赖-->
<dependency>
    <groupId>org.apache.rocketmq</groupId>
    <artifactId>rocketmq-spring-boot-starter</artifactId>
    <version>2.0.3</version>
</dependency>
gradle配置如下
implementation 'org.apache.rocketmq:rocketmq-spring-boot-starter:2.0.3'
消费服务发送方配置如下:
## application.properties
rocketmq.name-server=ip:9876
rocketmq.producer.group=my-group
消费服务发送方程序如下:
@SpringBootApplication
public class ProducerApplication implements CommandLineRunner {
    @Resource
    private RocketMQTemplate rocketMQTemplate;

    public static void main(String[] args){
        SpringApplication.run(ProducerApplication.class, args);
    }

    public void run(String... args) throws Exception {
        rocketMQTemplate.convertAndSend("test-topic-1", "Hello, World!");
        rocketMQTemplate.send("test-topic-1", MessageBuilder.withPayload("Hello, World! I'm from spring message").build());
    }

}
这里图省事的话可以将消费者和生产者写道同一个项目中。
消息消费方配置如下:
## application.properties
rocketmq.name-server=ip:9876
消息消费方运行程序如下:
@SpringBootApplication
public class ConsumerApplication{

    public static void main(String[] args){
        SpringApplication.run(ConsumerApplication.class, args);
    }

    @Slf4j
    @Service
    @RocketMQMessageListener(topic = "test-topic-1", consumerGroup = "my-consumer_test-topic-1")
    public static class MyConsumer1 implements RocketMQListener<String> {
        public void onMessage(String message) {
            log.info("received message: {}", message);
        }
    }
}
到现在为止我们就可以在本机上快乐的试验各种关于RocketMQ的相关东西了。
大家可以直接从上面拉取项目,启动RocketMQ只需要两步。
- 修改
broker.conf中的brokerIP1参数,修改为本机IP - 进入
docker-compose.yml文件所在路径,执行docker-compose up命令即可
如果大家不想自己搭建Springboot项目的话,可以从https://github.com/modouxiansheng/Doraemon上面直接拉取下来就行了。